
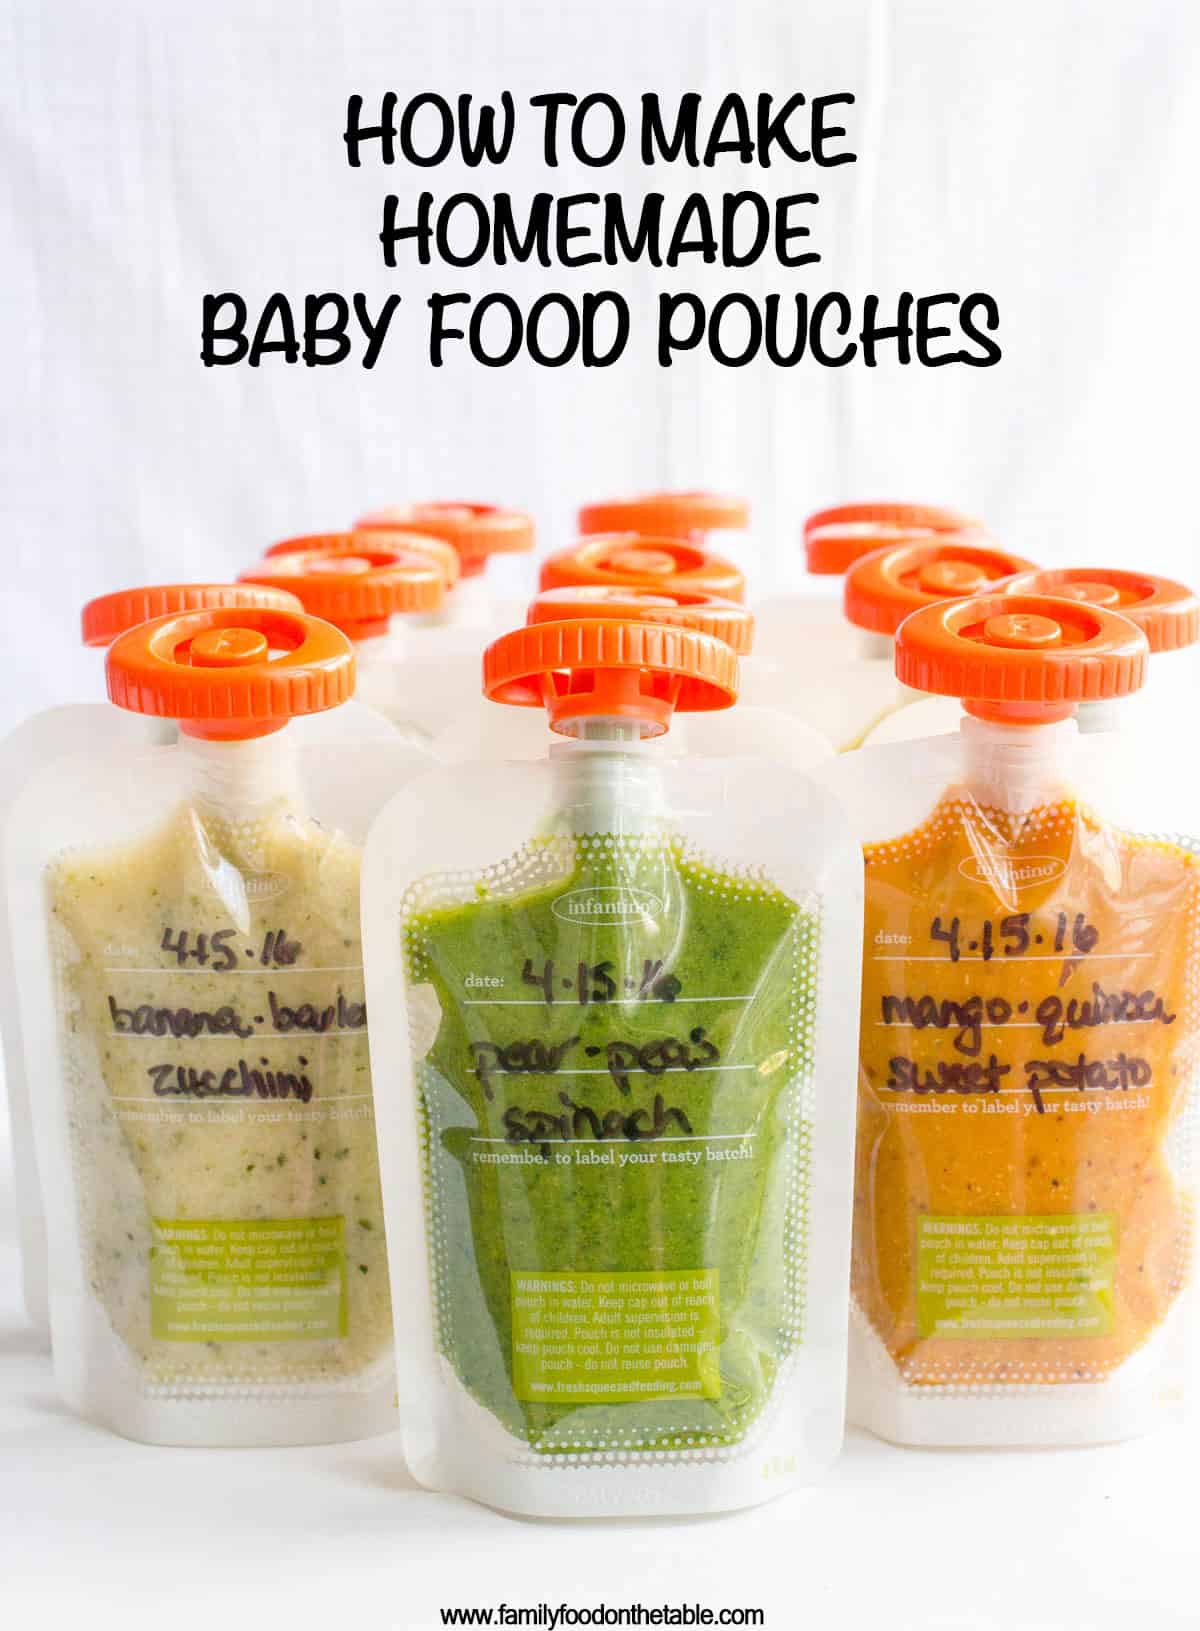
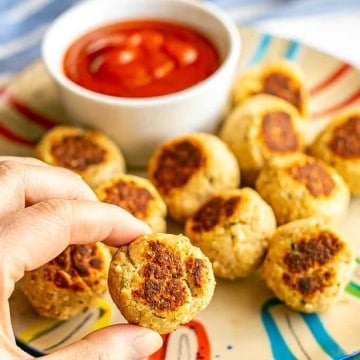
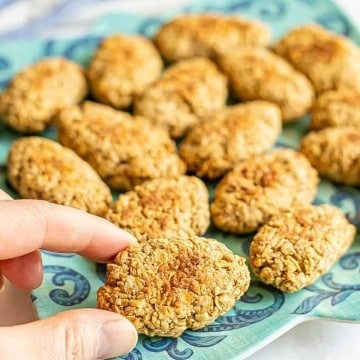
Homemade baby food pouches are easy to make, portable, squeezable and there are tons of combination possibilities! A great way to serve healthy fruits, vegetables and whole grains to your little one.
I made ALL of the baby food for both of my little ones. Which was no small feat because they were very hearty eaters. A good thing, but whew, kept me busy in the kitchen!
I always made big batches of purees, to knock out a bunch at a time, and inevitably, I'd be left with extras when they were moving onto finger foods and self-feeding.
So I started turning those purees into homemade baby food pouches.
(I also have tons of other ideas of ways to use leftover baby food - I didn't want to waste a bit!)
You can of course buy squeeze pouches in the store.
They have lots of different kinds of applesauce mixes, yogurt squeezies, and fruit and veggie combinations.
But you can make your own so quickly, easily and for much less money. Plus, you can customize them to your little one's liking and feel good that you're controlling the ingredients.
My kids are older now - M is 5 next week (yikes!) and J is coming up on 3 - but they still love these squeezies. M says she has lots of friends who bring them for lunch, so she's always asking for me to send them to school.
And I'm happy to.
I love that it's an easy way to ensure they are eating their veggies. They will take down one of these pouches in a matter of minutes but they don't always dig into a big bowl of peas or a plate full of broccoli. #yet #Iwontgiveup
So today I'm giving you the run-down on what I use, how it works and 5 easy homemade squeezie combinations to get you started.
You can also check out these 5 additional homemade baby food pouches for more ideas! And you'll be coming up with your own favorite recipe combinations before long.
So, let's dive in.
Oh, and if you want to jump on down to the recipes, just scroll to the bottom of the post. The recipe card is above the comments section.
Equipment:
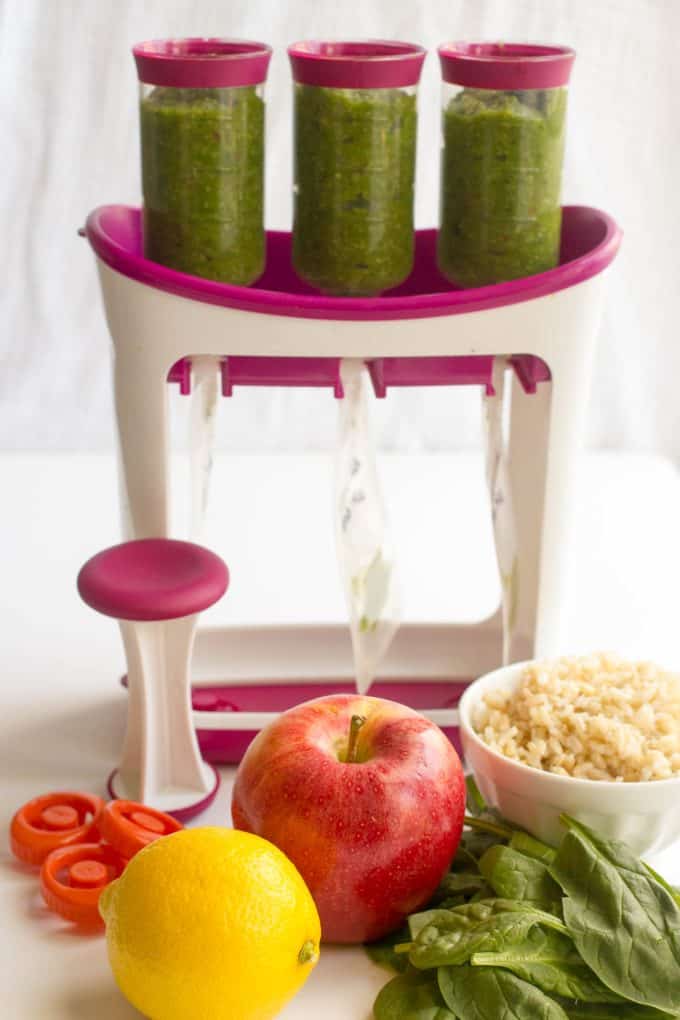
I have the Infantino Squeeze Station and it's been great. It's the only specific baby food equipment I've bought and it was definitely worth it.
You'll also need to buy refill pouches (they come in batches of 50 and you will go through them!)
They have other accessories, but I've stuck to these basics and been fine.
You'll also need an immersion/hand blender or regular blender to make the purees to put into the squeeze pouches.
How to make baby food squeeze pouches:
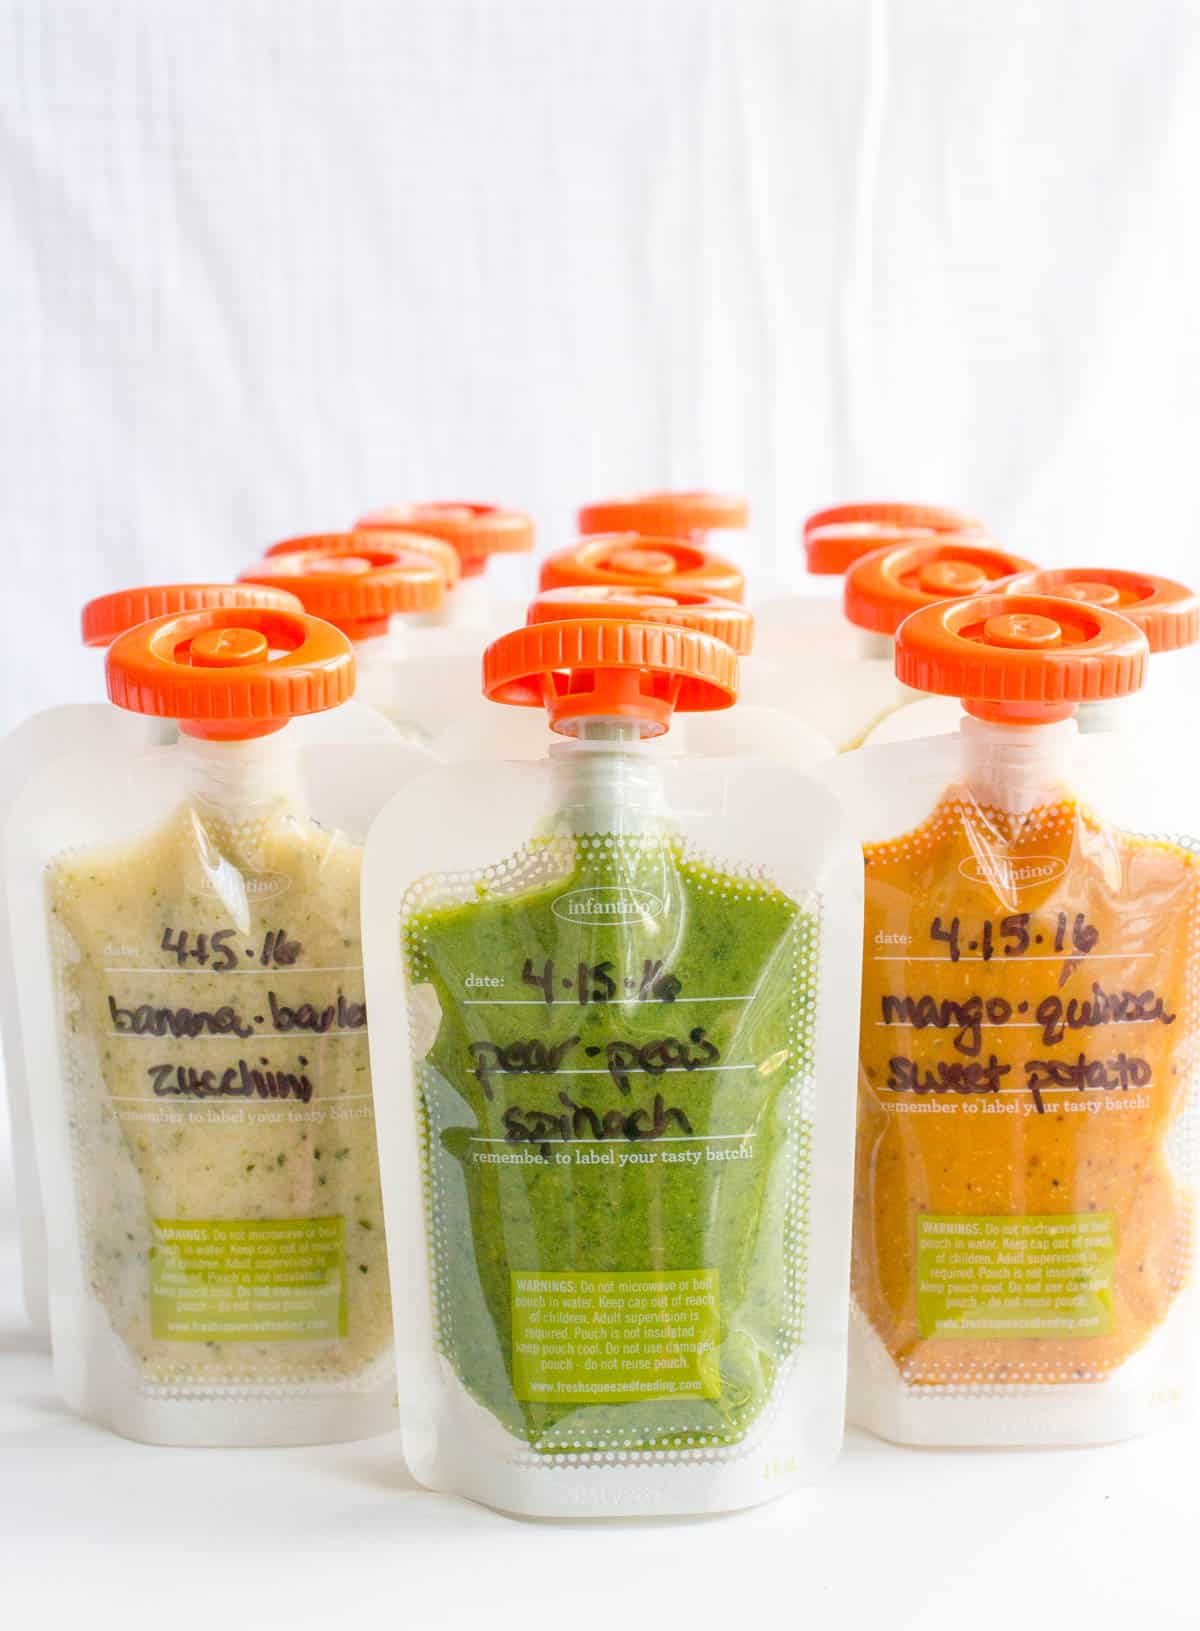
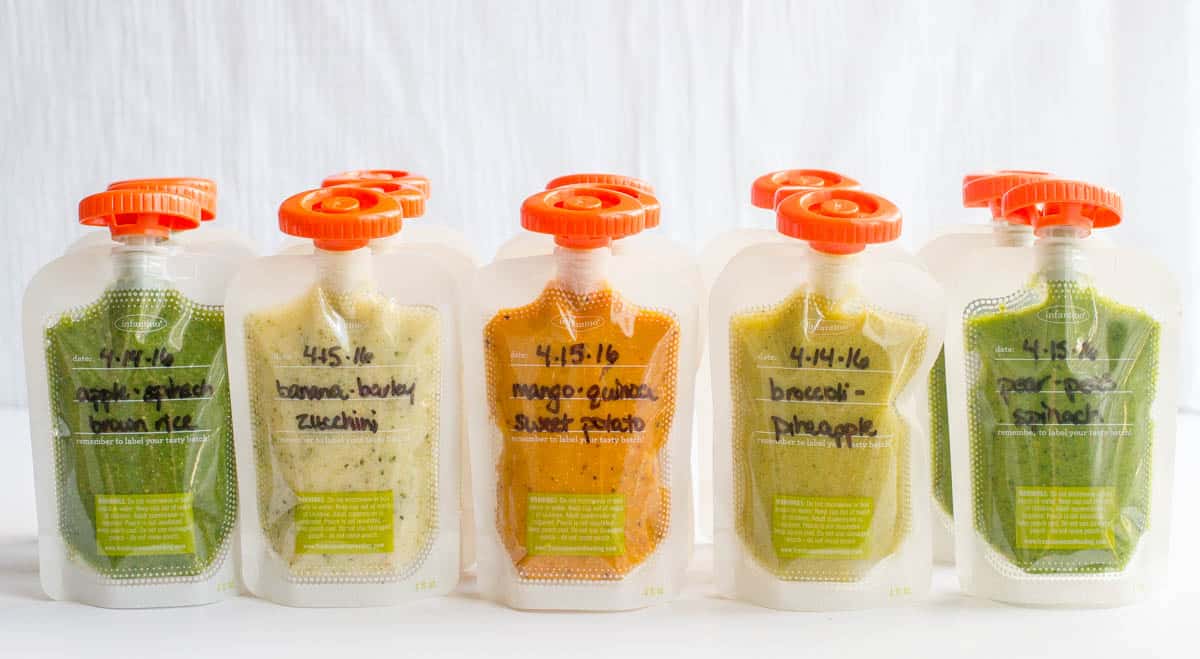
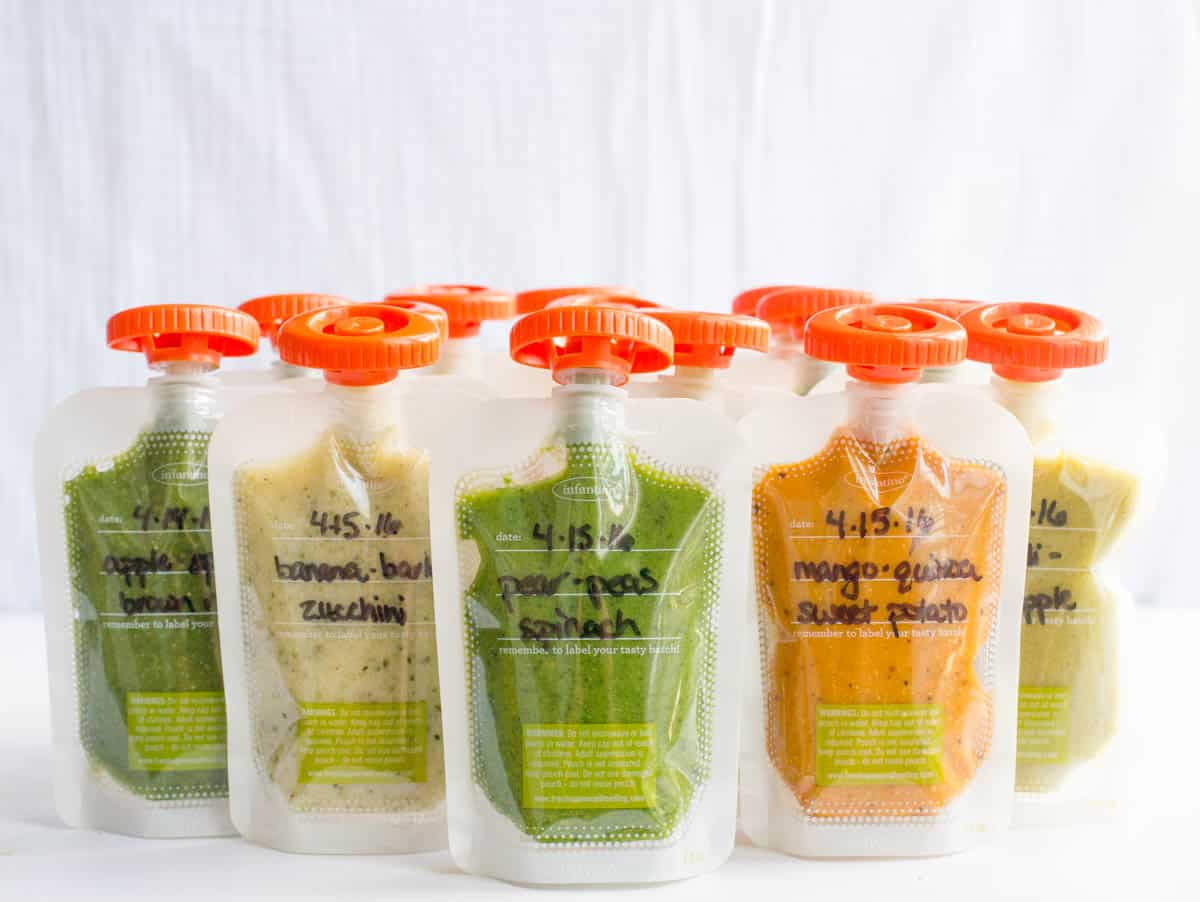
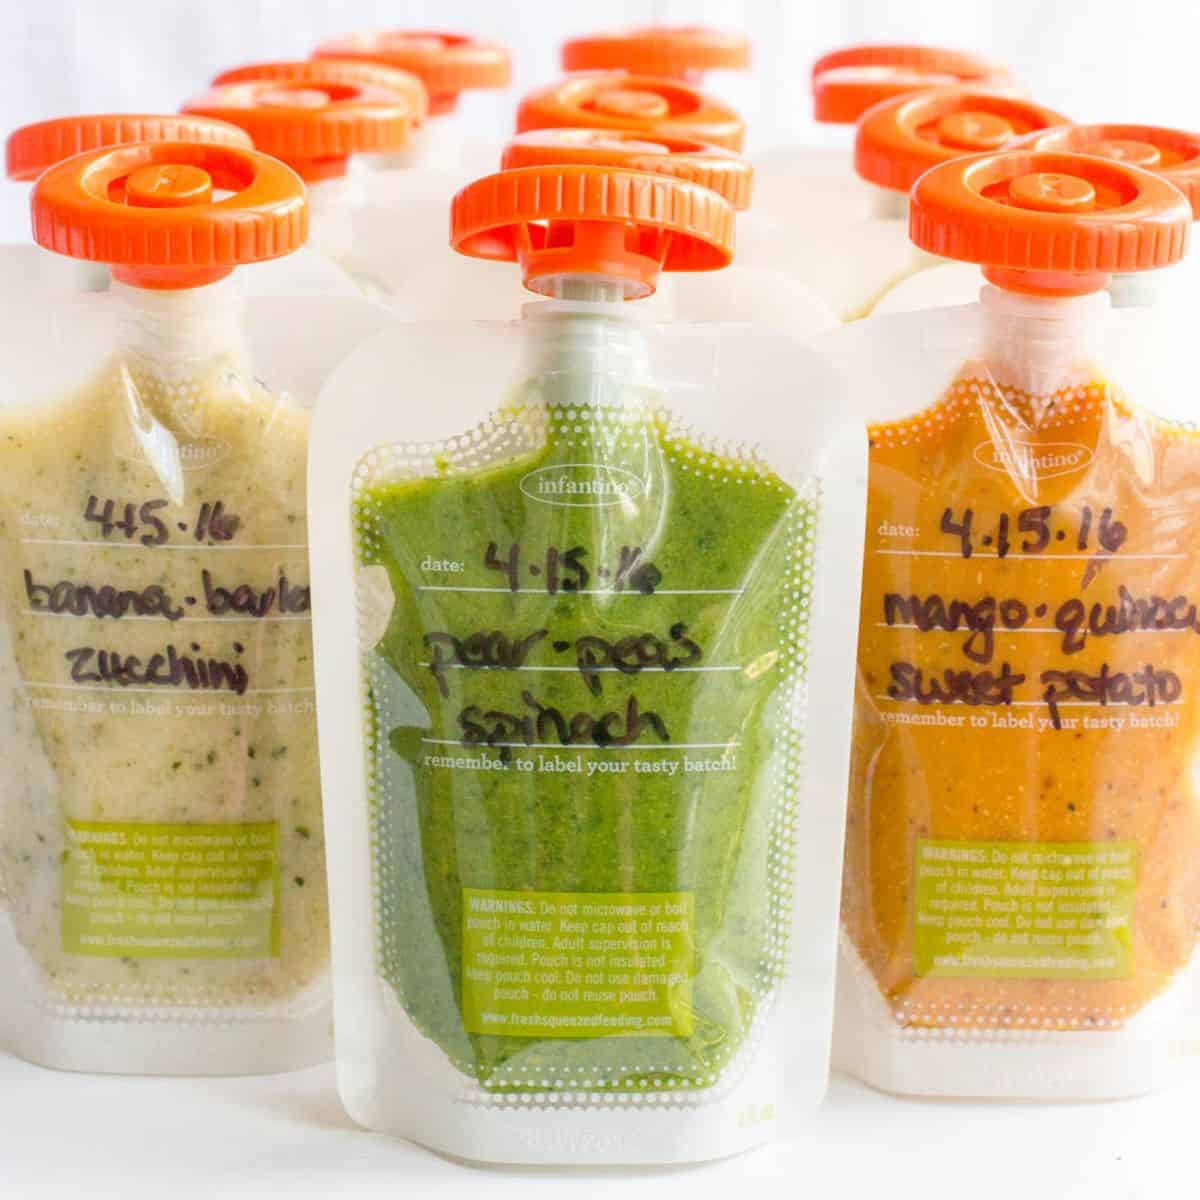
Step 1. Set up the station. You set up the squeeze station by inserting three pouches into the bottom (they fit through some grooves and sort of snap in.) Then you put the empty containers on top and screw them onto the bags to prepare for filling.
Pro tip: Be sure to write the contents and date on your bags before you start to fill them. Much easier to do it before rather than after they're filled.
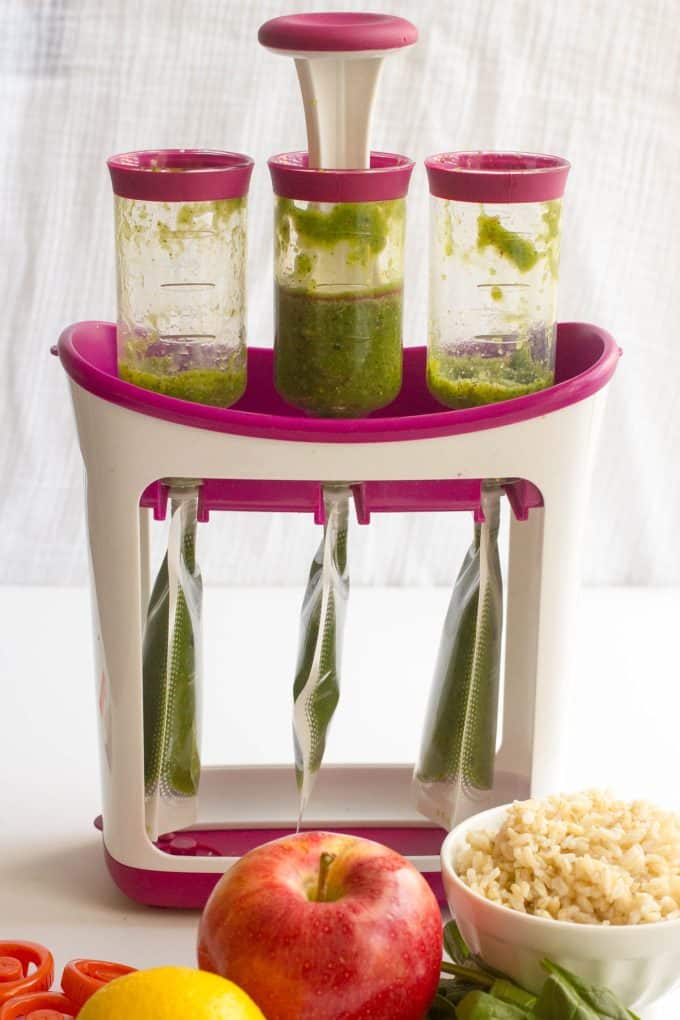
Step 2. Add puree mixes. Next, spoon your puree mix into each container, filling it almost to the top. You use the press tool and push the puree down into the pouch. It's a weirdly gratifying feeling.
Note: If the mixture gets stuck or won't push, you probably have a small chunk in your puree that got caught in the hole. Just unscrew your tube, dump the contents back into your blender and reblend (or pick out the offending piece if you see it).
Step 3. Remove the bags. After the bags are filled, unscrew the tubes from the top and carefully pull the bags out, keeping them level so they don't spill. Twist on the orange top and voila!
It's really easy and actually kinda fun!
Tips and Tricks:
- Lemon: Add 1 tablespoon lemon juice to all of these to help preserve them. The only exception is the pineapple-broccoli mixture. The citrus from the pineapple is enough on its own.
- Peels: You can keep the peels on the pears and apples, just be sure to puree them very well so pieces don't get stuck and prevent the mixture from going into the squeezie bags.
- Cooking: The vegetables and grains need to be cooked and soft, so plan ahead. Or use leftovers. These can be a great way to use up scraps and reduce food waste.
- Consistency: If any of your mixtures seem too thick (because the water content of fruits and veggies can vary), just add a bit of applesauce or a splash of water to the blender until its thin enough.
- Size: Each pouch holds about 4 ounces. Most of these batches for me make about 3 squeezies worth. You can of course always double up if you want to knock out a bunch. They freeze great, so you might as well!
Storage Tips:
- Homemade squeeze pouches, once made, should be stored in the refrigerator. Make sure they are labeled and dated. They will keep for up to 2-3 days in the fridge.
- You can also freeze the pouches! Pop them in the freezer for up to 3-4 months. Thaw overnight in the refrigerator before giving to your little one.
- Traveling? You can safely transport these pouches for up to 1-2 hours. If you're going to be out longer than that - or if it's a very hot day - I would recommend packing them in a cooler.
Oh, and these should all be served cold or at room temperature; they aren't meant to be heated or served warm.
Check out the recipes below and get to making some baby food pouches. I hope your little one enjoys!
XO,
Kathryn
P.S. You can find more baby food help, resources and recipes in my cookbook. Healthy, Quick and Easy Baby Food has ALL the info you need to get started plus 100 recipes ranging from single purees to combinations to finger foods and toddler foods.

Homemade Baby Food Pouches
Ingredients
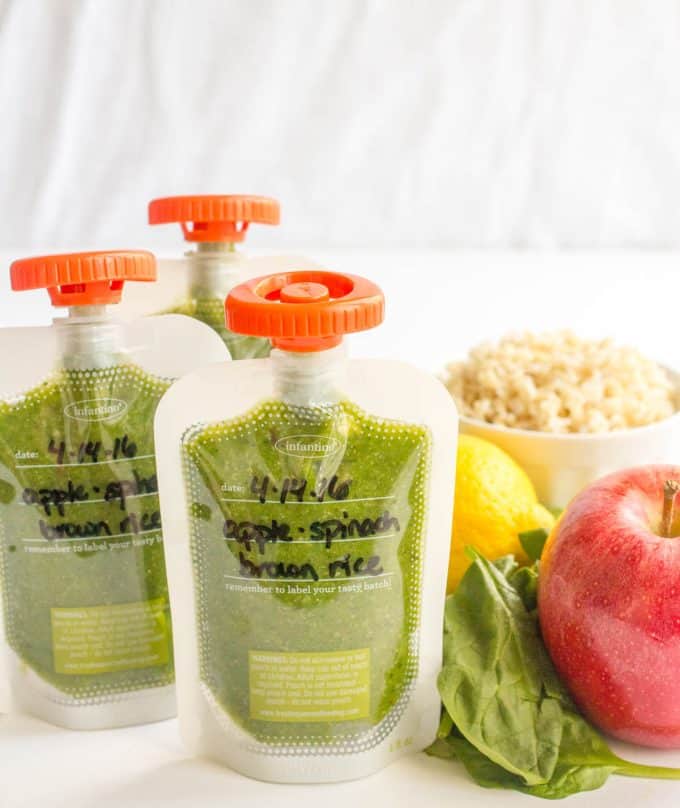
For the apple-brown rice-spinach pouches:
- 1 apple, core removed and roughly chopped
- ½ cup cooked brown rice
- 1 cup packed fresh spinach leaves (raw)
- Juice of ½ lemon
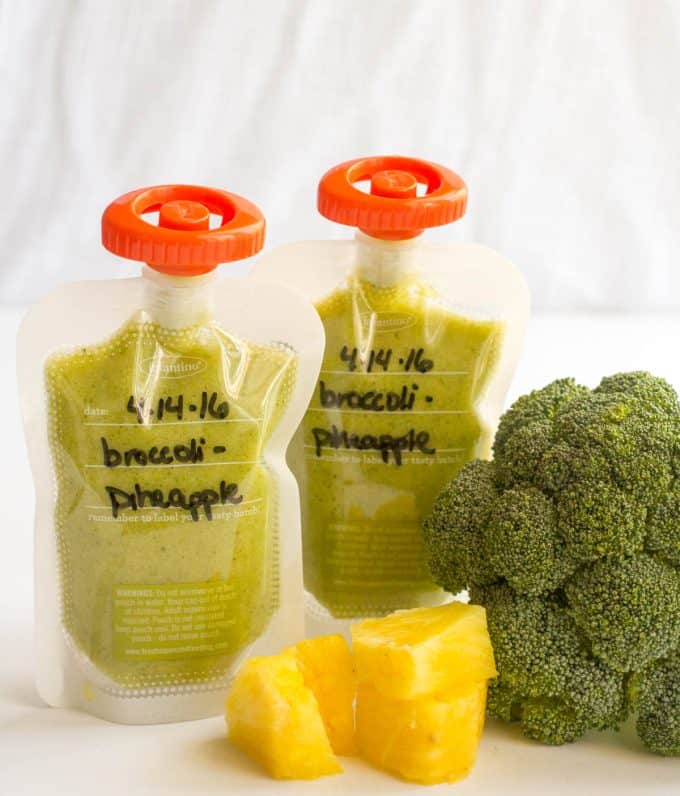
For the pineapple-broccoli pouches:
- 1 cup cut pineapple (thawed if frozen)
- ⅔ cup cooked broccoli florets
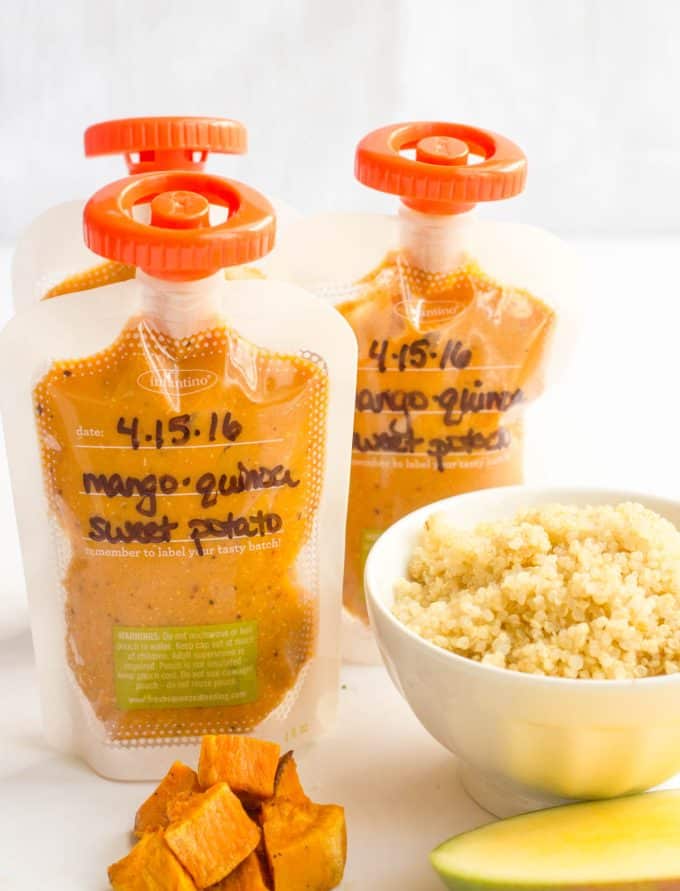
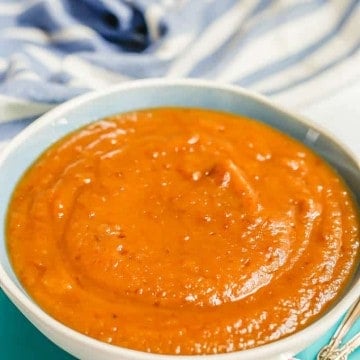
For the mango-sweet potato-quinoa pouches:
- 1 ripe mango, peeled, seed removed and roughly chopped
- ½ cup cooked sweet potato
- ½ cup cooked quinoa
- Juice of ½ lemon
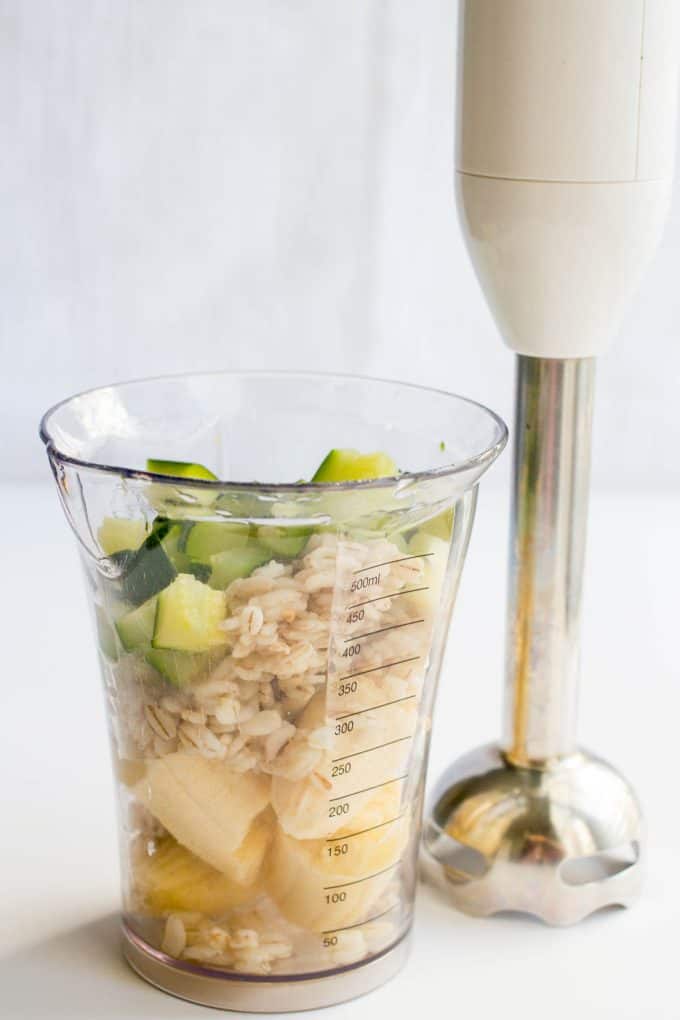
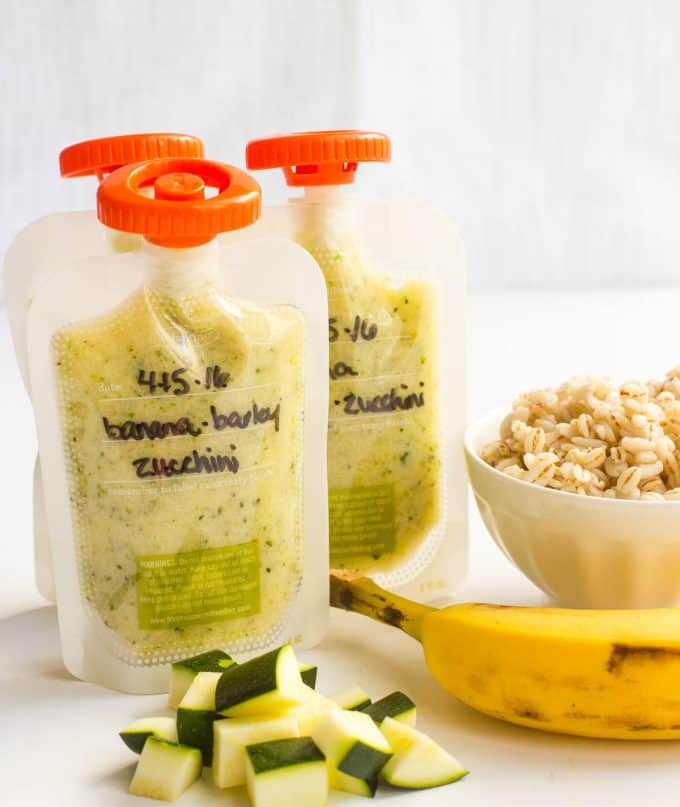
For the banana-barley-zucchini pouches:
- 1 ripe banana
- ½ cup cooked barley
- ½ cooked chopped zucchini
- Juice of ½ lemon
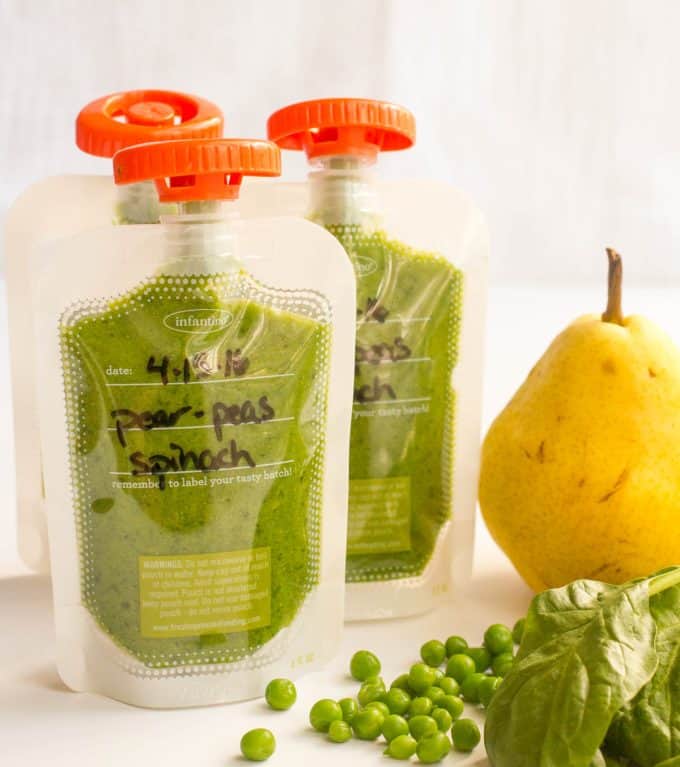
For the pear-peas-spinach pouches:
- 1 ripe pear
- ½ cup cooked peas
- 1 cup raw spinach
- Juice of ½ lemon
Instructions
- Make sure all of your grains and veggies are cooked, if indicated.
- Combine all ingredients for each pouch combination in a blender or immersion blender and blend until it's a smooth, pourable consistency. (See notes.)
- Label your bags, set up your station and add the mixture to the squeeze station containers, filled to the indicated line. Push down with the press tool and fill each bag. Remove the bags from the station and twist on the tops. They are ready to serve! (See notes below for storage tips.)
Save This Recipe
Notes
Nutrition
Serena says
Wow. This is such a good idea! Impressive flavors too!
Kathryn says
Thanks Serena! My kiddos love these squeeze pouches and it's such an easy way to get healthy foods in them!
Cheyanne @ No Spoon Necessary says
Boy and I can't have children, so I won't be making any baby food in this life time. But, my friend just had a baby and I know she is going to LOVE this post Kathryn!! Those squeezies packages are so cute!! Emailing her this link pronto! Cheers, friend!! <3
Kathryn says
Well I didn't know that Cheyanne - and I'm guessing your cute fur babies aren't really interested in purees, haha 🙂 But you are a sweet friend to pass this along! XO
Jordan says
Trying this idea out! What is the best thing to add if the purée is too runny? I’m not following your recipes exactly and some of mine are too runny!
Kathryn says
If you are using them soon, you can add a frozen fruit that would blend up thickly and be used that way quickly. Or you could use a grain (oats, quinoa, brown rice, barley, etc.) or chia seeds as a thickener. I hope that helps!
Laura says
What a great idea! I've made all my kids' baby food (baby #3 is finally one with purees praise the Lord! LOL)! But they're always a pain to travel with! These would be so easy to grab and go, and even the older kids would love them!!
Kathryn says
Yay for loving the purees! But you're right, it can be tough to travel with baby food - we did a couple of week-long trips and I felt so loaded down with all the food I had made ahead to take! These squeezies are perfectly portable and yes, definitely work for older kids too! Good luck 🙂
Lauren Hewitt says
Hi!
You've used reusable pouches but have written on them in pen, what pen have you used? Im assuming this easily wipes off to be able to reuse?
Thanks!
Kathryn Doherty says
Hi Lauren! The pouches I use are not re-useable. I would buy refills in bulk because we go through them quickly. (It's these: https://www.amazon.com/Infantino-Squeeze-Pouches-50-Count/dp/B009IWNPXK/ref=sr_1_1?ie=UTF8&qid=1425947647&sr=8-1&keywords=infantino+pouches) It was just a sharpie that I used to date and label them. If you have re-useable ones, you can try a dry erase marker and see if that works. I've also labelled things for the freezer before by writing on a piece of paper and then taping the paper to the container. Hope that helps!
Kathryn says
Thanks Charlene 🙂
Cristina @ I Say Nomato says
I don't have babies but this is brilliant! What an easy way to make sure you know exactly what your little ones are eating 🙂 Thanks for sharing with the Wednesday Showcase!
Kathryn says
Thanks Cristina! I love being able to control the ingredients and quality of their food!
Claire says
Hi! Wonderful recipes! When grabbing these to go after making them should they be kept chilled with an ice pack? Thanks!
Kathryn Doherty says
Hi Claire! If you are sending these to school for lunch or taking them somewhere for more than an hour or so, then yes, I pack them with an ice pack. If you’re just running out to the playground or something, I think they would be fine for up to 45 minutes or an hour at room temp if it’s not a hot day. I hope that helps!
Rachel Osborn says
You inspired me to make some of these myself this week! I am tempted to buy the squeeze station, but I have refillable pouches already. They are just a pain in the butt to refill. 😛
Kathryn says
So happy to hear that Rachel! I have really liked the squeeze station but those refillable pouches certainly have their appeal as well.
Jenna @ A Savory Feast says
This is so helpful! I'm planning to make my own baby food once my son old enough. I love the idea of putting them in squeeze pouches. That makes it so much easier for when we are out and about! Pinning for when I need this.
Kathryn says
That's awesome Jenna! I have lots of resources (check the Resources tab at the top) for doing homemade baby food - it really is easy. You just gotta get in the habit! And yes, squeeze pouches are super helpful for on-the-go days! And later, for preschool lunches 🙂
Angela @marathonsandmotivation.com says
My kids are 7 & 10 now, but I did make a lot of their baby food & Loved doing it!! this is a great post for new Moms, Pinning 🙂
Kathryn says
Thanks so much Angela!
Angela says
Hi I love these ideas. can I add meat to these recipes!
Kathryn says
Hi Angela! I've always used these pouches for fruits, vegetables and grains, but I think you could add meat. If you wanted to add chicken, for instance, just make sure it's fully cooked and very well pureed before you mix it in with your other ingredients and prepare it for the pouches. Any mixture you use needs to be thin enough to get into the squeeze pouch (and of course, for your child to squeeze back out!) Hope that helps!
Natalie says
Have you ever tried adding an avocado to a puree? I'm wondering how that comes out color-wise and how it freezes...
Thanks for the awesome recipes!
Kathryn says
I have not but I think it would work. You'd definitely need the lemon juice to keep it from browning and while they say frozen avocado doesn't work on its own taste/texture wise, it's apparently fine to freeze to use in smoothies or guac, so this should be the same. Would love to hear if you try it!
Ellie says
I would love to see more of your recipes! These are great.
Kathryn says
Thanks so much Ellie! I will have to put together another round-up of combinations we love!
Kim says
I would love some more combinations as well! I actually just bought the infantino squeeze system this week and am very happy to have found your post!
Kathryn says
I hope you love the Infantino system Kim! I've used it for years now and I'm a big fan. I just did a post on fruit-flavored applesauce, that I mostly pack into squeeze pouches for my kids. You can find that here: https://www.familyfoodonthetable.com/homemade-applesauce-5-fruit-flavors/ I've got tons of other combinations I've written down over the years so I'll have to get another round-up post going soon!
Alex says
Hey i tried the spinach apple rice recipe and it turned out really nice but when i freeze them and then defrost the fibrous stuff clumped together separately from the juices. It happened with other recipes i tried too. Did anyone else have this problem or know why that might happen?
Amanda says
I'm getting ready to start making baby food for my baby. How long can these be frozen?
Kathryn says
Good for you Amanda!! I usually use mine in 3 months or so, but I think they'd be fine up to 6 months in the freezer. Good luck with baby food making and let me know if you have any questions!
Megan @ MegGoesNomNom says
You inspired me to trying making some homemade pouches for my little one. I tried the mango/sweet potato/quinoa and the pears/peas/spinach and unfortunately the 12 month old was not a fan of either! 🙁
Kathryn says
Hi Megan - sorry your baby didn't like the first couple of ones, but keep trying! Use whatever flavors he/she already likes and start with that. (Happy to give you some ideas for combinations based on those if you want!) Or go with a basic apple-spinach or peach-oats combo to start simple. Sometimes it takes a lot of trial and error, with squeeze pouches and just baby food in general, and sometimes it takes repeated exposure to get them to like a new flavor. Hope you stick with it!
Tatiana says
Yay! Thanks so much for this!! Just ordered my maker and sip uevthese recipes!
Kathryn says
So glad you found this useful Tatiana! I'm hoping to do another round-up of homemade baby food pouch ideas soon so stay tuned!
sharna says
Hey Kathryn,
How long could you store in the fridge? could you vaccum seal the bags?
Kathryn says
Hi Sharna! You can keep these up to 3-5 days in the refrigerator and up to 3-5 months in the freezer. I've never done vacuum sealing, so I'm not sure about that. Hope you try them!
Julie says
I was on the site earlier in the week and pulled up the recipes. I was going to make them today but now I cannot find the recipes on here! Is there a link missing? Or am I missing something? Thank you!
Joanna says
Hi just wondering if you've used brown rice flour/barley flour or oatmeal in the pouches rather than cooking the rice ?
Kathryn says
Hi Joanna! Yes, I have used oatmeal in squeezies but not brown rice flour or barley flour. I would imagine they would work just fine - just make sure to have them pureed well and add enough liquid to keep them liquidy. (I've found that cooked oats soak up tons of liquid so I have to add extra to keep it smooth enough to go into a squeeze pouch.) Hope that helps!
Beth says
How old would you recommend the baby be to try these flavors?
Kathryn says
Hi Beth! It varies a bit baby to baby... Both of mine were at least 10 months before they could do squeeze pouches (and at ages 3 and 5, they still love them!) but a little earlier might work if your baby is ready. Also, here's my baby food introduction schedule (soon to be updated) if you want to check that for different foods at different stages: https://www.familyfoodonthetable.com/introducing-baby-food-schedule/ Hope that helps!
Rob says
Hi there
Where do you get the pouches?!
Kathryn says
Hi Rob! I bought everything on Amazon. Here's my link from above for the refill pouches: http://www.amazon.com/Infantino-Squeeze-Pouches-50-Count/dp/B009IWNPXK/ref=sr_1_1?ie=UTF8&qid=1425947647&sr=8-1&keywords=infantino+pouches Hope that helps!
Kristen says
Wonderful post! I made the Spinach, Pears and Peas one today and added in some quinoa - my 14 month old sucked it right down! Thanks for the inspiration 🙂
Kathryn says
Yay, I'm so happy to hear that - thanks for sharing! And my 4-year-old son STILL loves that combo! 🙂
Ashley says
I'm super excited to start this process this weekend! How long can you keep these in the freezer for and are these okay at room temp once thawed for at least 5 hours? Prepping for daycare so just curious how to handle. Thanks!
Kathryn says
Hi Ashley! These should be OK in the freezer for up to 4-5 months. I always keep mine chilled once thawed (and use them within 2 days) to make sure they're safe. I just put them in a lunch box with an ice pack. Hope that helps!
Jen says
do you still need to use the lemon juice if you're freezing them directly?
Kathryn says
Hi Jen! I would recommend still using the lemon juice. I usually freeze most of mine directly, too, but I think the lemon helps keep everything fresh and from changing colors - both in the freezer and once you defrost it to use. Hope that helps!
Kristin says
Hi, I made these for my firstborn and am starting to make them for my second. My question is do you just give this to them cold or do you put in warm water to warm before giving to your little one? My oldest liked everything warm even when we got to milk. So just curious how you give to your little one.
Kathryn says
Hi Kristin! I've also given these to my kids cold, straight from the refrigerator. You could certainly try heating them up - maybe by placing them in a bowl of warm water - but be sure to check the package carefully to make sure that's safe. Hope that helps!
Leah says
Hi! I am wondering how you travel with these.. do you thaw them and then put them in a bag with an ice pack to keep them cool or what? I love making them but haven’t tried using them outside the house yet.
Kathryn says
Hi Leah! When I send these to school with my kids, they are in a lunchbox with an ice pack. When we take them with us out to lunch at a restaurant on the weekends, they're also in a lunchbox with an ice pack. If you are traveling out of town or on a road trip, I'd suggest having them in a cooler. If you're just running out to a playground or something, I think they would be fine for up to 45 minutes or an hour at room temp if it's not a hot day. I hope that helps!
Jessica says
My baby is 15 weeks but this is exactly what I want to do now that it was decided I will be staying home instead of going back to work. Do you have any suggestions on which food combinations to try first? Should I wait to do combinations to check for food allergies or go straight for it? FTM so I'm learning. Any extra advice would be appreciated. I'm just doing some research now, since we won't start solids until 6 months.
Kathryn says
Hi Jessica! Good for you for researching and figuring this out in advance - that's awesome planning! So, I have a few posts that might be helpful for you to read through to get started. This is my introduction to baby food post with some basics to think about: https://www.familyfoodonthetable.com/homemade-baby-food-101-introduction/
And this is my introducing solids schedule - when to introduce different foods (and yes, you do need to do one at a time to monitor for allergies and reactions): https://www.familyfoodonthetable.com/introducing-baby-food-schedule/
And these are all my round-ups of making a bunch of different basic baby foods at once (think 5 different foods in 20 minutes - cause life with baby is BUSY!) -- https://www.familyfoodonthetable.com/category/beginner-baby-foods/
And ALL my baby food resources can be found through the main baby food portal: https://www.familyfoodonthetable.com/homemade-baby-food/
GOOD LUCK! And let me know if you have any questions as you get going - I'm happy to help! XO